Best way to create 5 midjourney v6 photorealistic images
The Photorealistic Revolution – Why Midjourney V6 Changes Everything
Midjourney V6 represents a seismic shift in the world of AI-generated imagery, fundamentally altering how creators approach Midjourney V6 Realistic Portraits and other hyper-realistic visuals. This latest iteration introduces advanced algorithms that dramatically lower the barrier to creating convincing, photorealistic images. Consequently, what once required extensive technical skill and hours of iterative prompting is now more accessible and effective than ever before. The model’s enhanced understanding of lighting, texture, and anatomical detail means users can generate professional-grade visuals with unprecedented ease.
Unprecedented Detail and Coherence
The core of V6’s power lies in its sophisticated neural architecture. It excels at rendering complex details like realistic skin pores, fabric textures, and nuanced lighting scenarios that mimic real-world physics. For instance, the model now handles challenging elements like human hands and facial expressions with far greater accuracy, a notorious hurdle in earlier AI art systems. This leap in coherence reduces the need for post-processing, allowing creators to focus on vision rather than correction.
Accessibility Meets Professional Quality
This advancement is not just technical; it’s democratizing. Marketers, designers, and small business owners can now produce branded visual content or high-fidelity product renders without a photography studio. Meanwhile, artists can explore hyper-realistic portrait styles or other leading AI art styles as a foundational tool. The model’s improved prompt adherence means ideas translate into images more reliably, making it a powerful asset for both paid advertising and creative exploration.
Ultimately, Midjourney V6 is more than an update; it’s a new standard. By blending cutting-edge research with user-friendly output, it changes everything from how we conceptualize digital art to how businesses execute visual marketing strategies at scale [Source: The Verge]. The photorealistic revolution is here, and it’s powered by algorithms that understand our world in breathtaking detail.
Essential Prompt Engineering Foundations
The Core Syntax: Your Prompt’s Blueprint
Every effective Midjourney V6 prompt begins with a solid understanding of its basic syntax. Think of your prompt as a structured sentence that guides the AI. The most fundamental structure is: Subject + Action + Context + Style. For instance, “a cyberpunk samurai (subject) drawing a sword (action) in a neon-lit Tokyo alley at night (context), digital painting, cinematic lighting (style).” This clear, descriptive language is far more effective than a vague request. Midjourney V6 excels at interpreting natural language, so you should write prompts as you would describe the scene to a human artist. However, precision is key; adding specific details like “wide-angle lens” or “volumetric fog” dramatically refines the output. For a deeper dive into foundational prompt writing, our Ultimate Guide to Writing Perfect AI Prompts for Beginners is an excellent resource.
Mastering Parameters: The Fine-Tuning Tools
Beyond the descriptive text, Midjourney V6 offers powerful parameters—special commands that control the image generation process. These are essential for achieving professional, consistent results. Key parameters include:
--ar(Aspect Ratio): Crucial for tailoring your image to specific formats, like a social media banner (--ar 16:9) or a phone wallpaper (--ar 9:16).--style: This parameter lets you tap into Midjourney’s curated aesthetic modes. Using--style rawgives you maximum control with less opinionated styling, while--style expressivecan create more dynamic and artistic interpretations.--chaos: Ranging from 0 to 100, this parameter influences the variety in your initial image grid. A higher--chaosvalue (e.g.,--chaos 70) produces more surprising and diverse compositions, perfect for brainstorming.
Advanced Prompt Engineering: Combining Elements for Precision
The true power of prompt engineering emerges when you combine core descriptive language with multiple parameters and advanced techniques. For example, to generate a highly specific product render, you might craft a prompt like: hyper-realistic ceramic coffee mug on a marble countertop, morning light, condensation, product photography, sharp focus --ar 4:5 --style raw. This approach gives the AI a rich, multi-faceted instruction set. Furthermore, using negative prompts (e.g., --no blurry, deformed, text) is a professional technique to exclude unwanted elements, steering the AI away from common artifacts. You can master this critical skill with our dedicated guide on Mastering Negative Prompts.
Iterative Refinement: The Path to Perfection
Finally, understand that prompt engineering is an iterative dialogue. Your first prompt is a starting point. Use the variations (V1, V2, etc.) and upscale (U1, U2, etc.) features to explore subtle changes. Analyze each output to see what the AI interpreted well and what needs clarification. Did it get the style right but the composition wrong? Refine your context description. Was the character close but the lighting flat? Add a specific lighting term like “chiaroscuro” or “golden hour glow.” This cycle of prompt, generate, analyze, and refine is the foundational practice that transforms basic ideas into perfectly realized visions. For a structured method to level up your prompts, follow our step-by-step guide to writing better prompts.
The 5 Photorealistic Image Types You Need to Master
Portraits: Capturing the Human Essence
Mastering photorealistic portraits means capturing the subtle details that make a face unique. This includes realistic skin texture, accurate lighting that sculpts the form, and expressive eyes that convey emotion. For instance, achieving the perfect interplay of light and shadow on a subject’s face is crucial for depth and realism. Moreover, attention to details like individual pores, hair strands, and natural reflections in the eyes elevates the image from good to indistinguishable from a photograph. For a deep dive into the techniques behind this, explore our comprehensive guide on the art and science of creating realistic AI portraits.
Landscapes: Building Immersive Worlds
Creating believable landscapes requires a command of natural elements, atmospheric perspective, and cohesive lighting. The key is to build a scene where every component—from distant mountains to foreground foliage—feels part of a single, tangible environment. Effective use of depth, where elements become less distinct and bluer with distance, is essential for immersion. Additionally, consistent light sources and realistic textures for rock, water, and vegetation are non-negotiable. To master these outdoor scenes, our guide on mastering AI for stunning landscape images offers expert techniques and prompt strategies.
Product Photography: Showcasing Detail and Value
In commercial contexts, photorealistic product images must highlight materials, finishes, and functionality to drive consumer confidence. This involves flawless surface rendering, accurate reflections, and contextual studio or lifestyle lighting that makes the item desirable. For example, a metallic finish should show realistic specular highlights, while fabric should have visible texture. Consequently, mastering this category is vital for marketing and e-commerce. You can learn to create these high-value assets through our ultimate guide to creating professional product renders with AI.
Architectural Visualization: Designing with Precision
This category demands technical accuracy in perspective, lighting, and material properties to visualize unbuilt spaces. Photorealistic architectural renders require correct scale, realistic material textures like concrete or glass, and believable interior or exterior lighting that mimics the sun or artificial sources. Therefore, consistency in shadows and reflections sells the illusion of a real space. This skill is indispensable for architects, designers, and real estate professionals. For related skills in creating 3D-style images, see our complete guide to creating 3D-style AI images.
Lifestyle Scenes: Telling a Relatable Story
Lifestyle imagery blends people, products, and environments to evoke emotion and narrative. The challenge is achieving natural human poses, authentic interactions, and a cohesive mood that feels candid, not staged. Lighting must be environmental and flattering, while all elements should serve the story. Because these images connect on an emotional level, they are powerful for advertising and brand storytelling. Mastering this often involves refining human elements; our guide on fixing hands, faces, and details in AI art is an essential resource.
Advanced Parameters & Settings for Maximum Realism
Unlocking the Power of --style raw
To achieve maximum realism in Midjourney V6, the --style raw parameter is your most powerful tool. This setting minimizes the AI’s default artistic interpretation, forcing it to adhere more strictly to the photographic and descriptive elements of your prompt. Consequently, it produces images with more accurate lighting, textures, and proportions, reducing the “AI-generated” look. For instance, a prompt for a portrait will yield results closer to a high-resolution photograph rather than a stylized painting. This parameter is essential for any project demanding authenticity, from realistic AI portraits to professional product renders.
Precision Control with --stylize
While --style raw reduces artistic flair, the --stylize parameter (abbreviated --s) allows you to fine-tune the remaining creative influence. This value ranges from 0 to 1000, with lower values (e.g., --s 50) producing results that are more literal and prompt-adherent, which is ideal for realism. Conversely, higher values (e.g., --s 750) inject more artistic interpretation and dramatic composition. For photorealistic work, keeping the stylize value low (between 50 and 200) is recommended to maintain control over the final output’s fidelity [Source: Midjourney Documentation].
Choosing the Right Aspect Ratio
The aspect ratio (--ar) is a critical but often overlooked setting for realism. Different compositions inherently suit different formats. A cinematic landscape might demand a wide 16:9 ratio, while a portrait shot is naturally suited to 2:3 or 4:5. Using an inappropriate aspect ratio can force the AI to awkwardly crop or stretch elements, breaking the illusion. For maximum control, specify your aspect ratio from the start. This is especially important if you plan to upscale AI images for print, where standard photo dimensions are required.
Optimizing Quality and Detail Parameters
Midjourney V6 offers advanced parameters to directly manipulate image quality and detail. The --quality parameter (--q) affects how much time is spent generating the initial image, with higher values (up to 2) yielding more detail. For realism, --q 1 or --q 2 is often worth the extra generation time. Furthermore, the --weird parameter (experimental in V6) can be subtly used to introduce unexpected, realistic details that break repetitive patterns. However, use it sparingly (e.g., --weird 50) to avoid unnatural results. Finally, always upscale your chosen image using the U buttons, as this process adds a significant layer of fine-grained detail and resolution that is crucial for a believable final piece. For troubleshooting common realism issues like blurriness or anatomical errors, our guide on fixing hands, faces, and details provides essential post-generation techniques.
Lighting & Composition Techniques That Fool the Eye
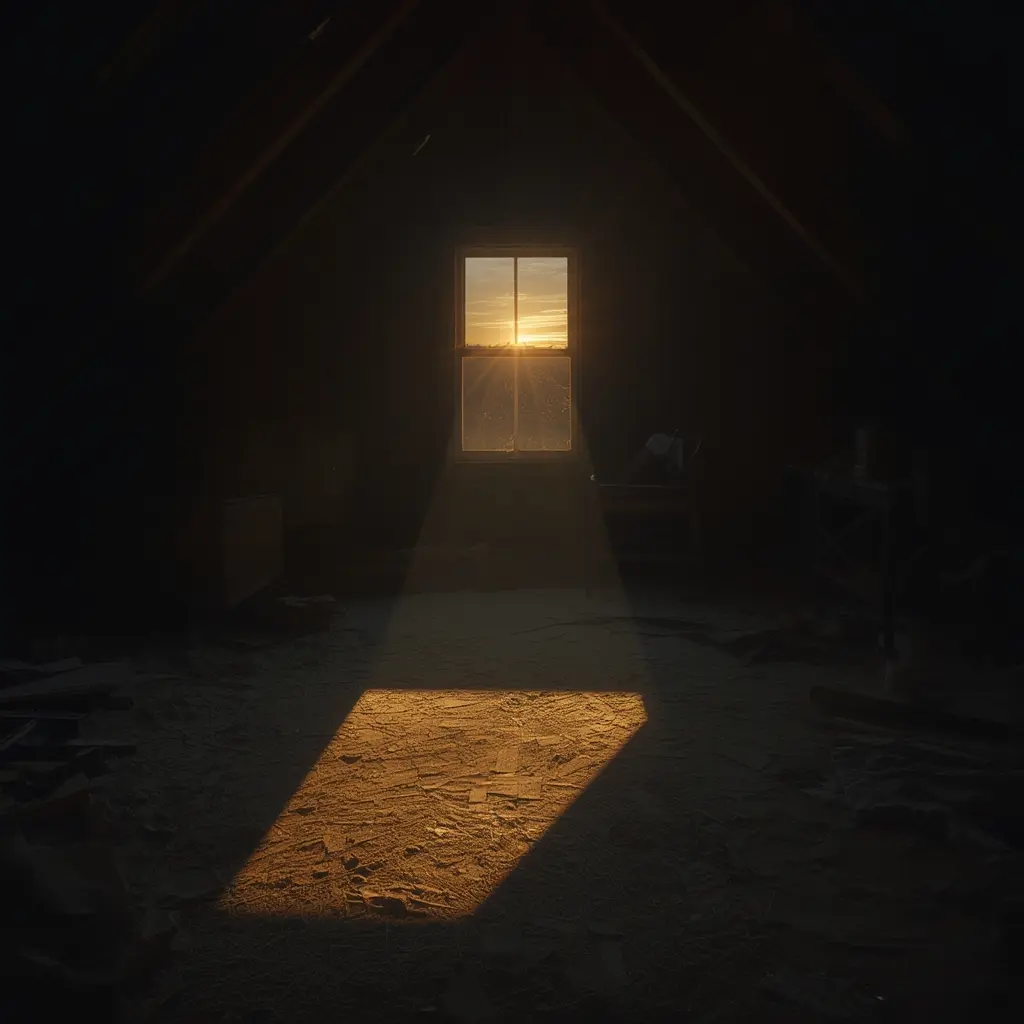
Mastering the Golden Hour for AI Images
The “golden hour”—the period shortly after sunrise or before sunset—is a photographer’s secret weapon for creating warm, soft, and emotionally resonant images. This lighting technique is equally powerful in AI art, adding a layer of natural beauty that can elevate your visuals from good to breathtaking. To replicate this effect, incorporate specific time-of-day keywords into your prompts. For instance, instead of a generic prompt, try: “a cozy cafe street at sunset, bathed in warm golden hour light, long dramatic shadows, cinematic, 35mm film”. This directs the AI to simulate the low-angle, diffused sunlight characteristic of this time. The result is often an image with enhanced depth, richer colors, and a mood that feels authentic and inviting [Source: Digital Photography School]. For more foundational prompt techniques, explore our Ultimate Guide to Writing Perfect AI Prompts for Beginners.
Controlling Depth of Field for Focus
Depth of field (DoF) refers to the range of distance within a photo that appears acceptably sharp. A shallow depth of field, with a blurred background (bokeh), isolates the subject and creates a professional, photographic look. Conversely, a deep depth of field keeps everything in focus, ideal for landscapes or architectural shots. You can control this in your AI prompts with descriptive terms. Use phrases like “shallow depth of field,” “portrait with creamy bokeh,” or “85mm f/1.8 lens” to blur backgrounds. For expansive scenes, specify “deep focus,” “everything in sharp detail,” or “shot on a wide-angle lens.” This simple technique adds immediate polish and directs the viewer’s eye exactly where you want it.
Applying the Rule of Thirds
The rule of thirds is a fundamental composition guideline that divides an image into a 3×3 grid. Placing key elements along these grid lines or at their intersections creates a more balanced and engaging image than centering the subject. While you can’t directly overlay a grid in most AI generators, you can describe the composition. Prompt with: “a lone tree positioned on the left third of the frame,” “a portrait with the subject’s eyes aligned with the top horizontal line,” or “a landscape with the horizon on the lower third.” This encourages the AI to generate a composition that feels intentionally designed and naturally pleasing to the eye.
Crafting Natural Shadows for Realism
One of the most telling signs of AI-generated imagery is incorrect or missing shadows. Realistic, coherent shadows are crucial for grounding objects and creating a believable scene. To achieve this, you must be explicit about your light source. Describe its quality, direction, and the shadows it casts. Effective prompts include: “hard sunlight from the upper left casting sharp, defined shadows,” “soft window light creating